Cisco IOS Site to Site VPN (Router)
Network Topology
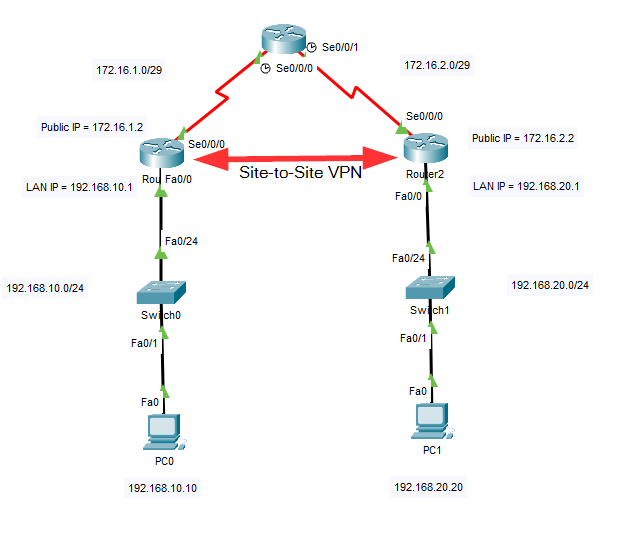
In this network configuration a site-to-site VPN between Router1 and Router2 across the link through Router0.
First let's set up the IP and routing information on all three routers as well as the two PCs.
Router0 IP and Routing Configuration Commands
Router0>enable
Router0#configure terminal
Router0(config)# interface serial 0/0/0
Router0(config-if)#ip address 172.16.1.1 255.255.255.248
Router0(config-if)#no shutdown
Router0(config-if)#interface serial 0/0/1
Router0(config-if)#ip address 172.16.2.1 255.255.255.248
Router0(config-if)#no shutdown
Router0(config-if)#exit
Router0(config)#ip route 192.168.10.0 255.255.255.0 172.16.1.2
Router0(config)#ip route 192.168.20.0 255.255.255.0 172.16.2.2
Router1 IP and Routing Configuration Commands
Router1>enable
Router1#configure terminal
Router1(config)# interface serial 0/0/0
Router1(config-if)#ip address 172.16.1.2 255.255.255.248
Router1(config-if)#no shutdown
Router1(config-if)#interface fastEthernet 0/0
Router1(config-if)#ip address 192.168.10.1 255.255.255.0
Router1(config-if)#no shutdown
Router1(config-if)#exit
Router1(config)#ip route 0.0.0.0 0.0.0.0 172.16.1.1
Router2 IP and Routing Configuration Commands
Router1>enable
Router1#configure terminal
Router1(config)# interface serial 0/0/0
Router1(config-if)#ip address 172.16.2.2 255.255.255.248
Router1(config-if)#no shutdown
Router1(config-if)#interface fastEthernet 0/0
Router1(config-if)#ip address 192.168.20.1 255.255.255.0
Router1(config-if)#no shutdown
Router1(config-if)#exit
Router1(config)#ip route 0.0.0.0 0.0.0.0 172.16.2.1
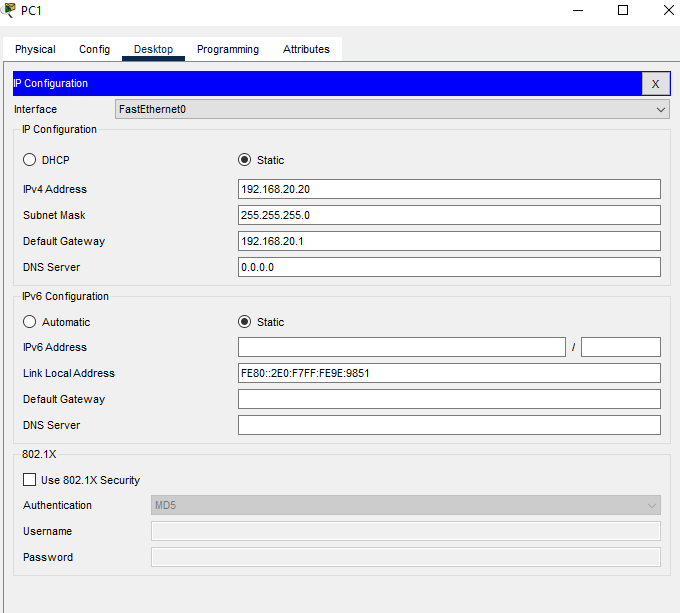
PC Computers IP Configuration

Now that all the routers and PCs have their IP addressing and routing information configured it is time to move on the the specific configuration for enabling the Site-to-Site VPN. This process can be divided into four phases.
Phase 1 - The Key Exchange Setup
| Phase 1 Commands | Notes |
| crypto isakmp enable | |
| crypto isakmp policy 10 | The number can be any number between 1 and 10,000. It identifies the priority of the policy. |
| encryption aes | this could be 3des but aes is more robust. |
| hash sha | sha = secure hash algorithm. md5 could be used but sha is more robust. |
| group 1 | Specifies the Diffie-Hellman group identifier, which the two IPsec peers use to derive a shared secret without transmitting it to each other. Group 1 is 768-bit |
| lifetime 3600 | Specifies the Security Association (SA) lifetime. The default is 86,400 seconds or 24 hours. As a general rule, a shorter lifetime provides more secure ISAKMP negotiations (up to a point). However, with shorter lifetimes, the security appliance sets up future IPsec SAs more quickly. |
| authentication pre-share | |
| crypto isakmp key ciscokey123 address 172.16.2.2 | The italicized text is just a text string that has to match on both sides of the connection. The IP address is the public IP address of our peer on the other side of the VPN connection. |
Phase 2 - Encrypting the Tunnel
| Phase 2 Commands | Notes |
| crypto ipsec transform-set vpnset esp-aes esp-sha-hmac | The italicized text is the set name and can be changed. This could be esp-3des and esp-md5-hmac |
| crypto map vpnset 10 ipsec-isakmp | The number is any number between 1 and 65,535 that identifies the sequence to insert into the crypto map. |
| set transform-set vpnset | |
| match address 100 | Match the addresses in the access control list coming up. This will identify the inside-to-inside traffic flow. |
| set peer 172.16.2.2 | This is the other router's outside interface. |
Phase 3 - Applying the Crypto Map to the Outside Router Interface
| Phase 3 Commands | Notes |
| int s0/0/0 | Whatever the outside interface of the router is (f0/0, g0/2, etc.) |
| crypto map vpnset |
Phase 4 - Creating an Access List to Identify the Traffic Flow (inside to inside LAN traffic)
| Phase 4 Commands | Notes |
| access-list 100 permit ip 192.168.10.0 0.0.0.255 192.168.20.0 0.0.0.255 | These are the inside addresses of both routers. |
Let's start with Router1
Router1 VPN Configuration Commands
Router1>enable
Router1#configure terminal
Router1(config)#crypto isakmp enable
Router1(config)#crypto isakmp policy 10
Router1(config-isakmp)#encryption aes
Router1(config-isakmp)#hash sha
Router1(config-isakmp)#group 1
Router1(config-isakmp)#lifetime 3600
Router1(config-isakmp)#authentication pre-share
Router1(config-isakmp)#exit
Router1(config)#crypto isakmp key ciscokey123 address 172.16.2.2
Router1(config)#crypto map vpnset 10 ipsec-isakmp
Router1(config-crypto-map)#set transform-set vpnset
Router1(config-crypto-map)#match address 100
Router1(config-crypto-map)#set peer 172.16.2.2
Router1(config-crypto-map)#exit
Router1(config)#int serial 0/0/0
Router1(config-if)#crypto map vpnset
Router1(config-if)#exit
Router1(config)#access-list 100 permit ip 192.168.10.0 0.0.0.255 192.168.20.0 0.0.0.255
Router2 VPN Configuration Commands
Router2>enable
Router2#configure terminal
Router2(config)#crypto isakmp enable
Router2(config)#crypto isakmp policy 10
Router2(config-isakmp)#encryption aes
Router2(config-isakmp)#hash sha
Router2(config-isakmp)#group 1
Router2(config-isakmp)#lifetime 3600
Router2(config-isakmp)#authentication pre-share
Router2(config-isakmp)#exit
Router2(config)#crypto isakmp key ciscokey123 address 172.16.1.2
Router2(config)#crypto map vpnset 10 ipsec-isakmp
Router2(config-crypto-map)#set transform-set vpnset
Router2(config-crypto-map)#match address 100
Router2(config-crypto-map)#set peer 172.16.1.2
Router2(config-crypto-map)#exit
Router2(config)#int serial 0/0/0
Router2(config-if)#crypto map vpnset
Router2(config-if)#exit
Router2(config)#access-list 100 permit ip 192.168.20.0 0.0.0.255 192.168.10.0 0.0.0.255
Check Status of VPN
Check the status of the Internet Security Association Management Protocol (ISAKMP) Security Associations (SAs) built between the peers.
Router1#show crypto isakmp sa

If you run the command right after establishing the VPN you might see a very blank status screen. You can wait for connections to start establishing across the VPN or you can simply do a ping across the VPN. Then when you run the command again you should see a more informative status like this.
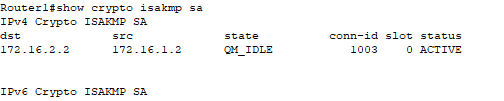
You can see from the output above the destination's (Router2) IP address and the source (Router1). And most importantly the status shows that the security association (link) is ACTIVE.
Check the Internet Security Association Management Protocol (ISAKMP) Policy
Router1#show crypto isakmp policy
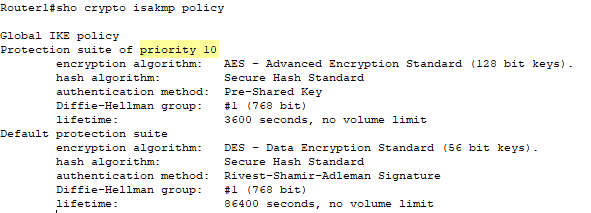
As you can see our new ISAKMP policy is at a higher priority than the default protection suite policy. This output shows the priority, the encryption type (AES), the authentication method (pre-shared), the Diffie-Hellman group (1), and the lifetime (3600). These are all the values we set in the configuration.
Check the Crypto Map Settings
Router1#show crypto map
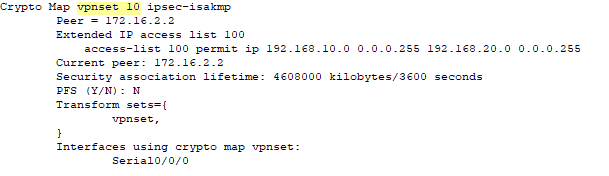
A wealth of information about the configured cryto map including the name and sequence number. The configured peer is visible. The access-list is present as well as the interface that the map is assigned.
Check the IPSEC Security Association
Router1#show crypto ipsec sa
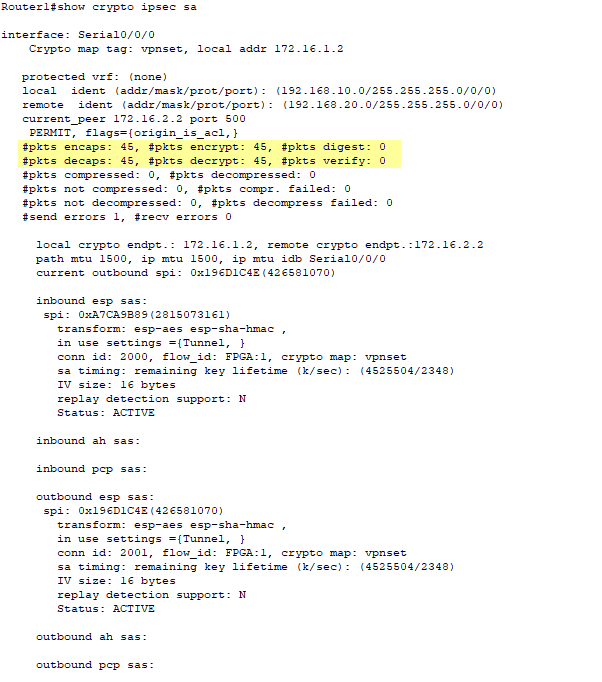
There is a lot of information given in this command but probably the most valuable is the highlighted area above showing that encapsulation and decapsulation is taking place across the VPN. Additionally, you can see status for inbound and outbound tunnel and the configured encryption algorithms.
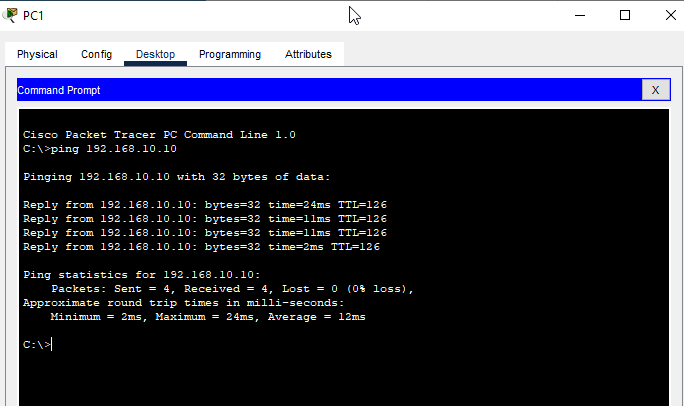
Check Ping from PC0 to PC1 and visa versa
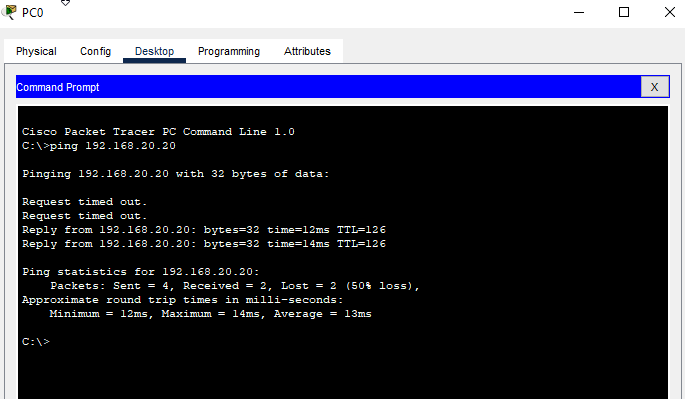
The first ping will most likely lose some packets, but subsequent pings will complete 100%